Thursday, April 28, 2011

Omelette

A brief word on eggs. They're brilliant. Any way you cook them.


So here's a recipe for a tortilla-esque omelette. Its a Russian/Eastern European recipe called Drachena. Its dead-easy, quick and healthy. It takes about the same time to make as it takes to boil up some new potatoes. Serve the omelette with the afore-mentioned potatoes, green salad or veg. I fried up some chorizo for Dan and scattered it over the top which he liked.

Drachena (slightly adapted, as ever)
Serves 3-4 as a light meal

2 tspns olive oil
6 spring onions - white parts sliced
1 garlic clove
100g tomatoes - diced
50g rye flour
4 tablespoons water
150g yoghurt
4 eggs
2 teaspoons of pesto
1 tablespoon fresh parsley
10g butter

Fry the spring onions in olive oil over a moderate heat for about 3 minutes, then add the garlic and fry for a further minute. Add the tomatoes and fry for a couple more minutes. Remove from the heat.
Mix the rye flour to a paste with the water. Add the yoghurt and pesto (I used my wild garlic pesto) and mix it thoroughly together. Break the eggs into another bowl, beat them, then add them to the flour and yoghurt mixture. Mix well, season, and add the parsley.
Heat the grill to a medium heat.
Put the tomatoes and spring onions back on a medium heat, add the butter. When the butter has melted add the egg mixture. Leave it on the heat until the bottom starts to set, then place it under the grill until it starts to colour on the top and is set. It should puff up slightly.
Cut into 3 or 4 wedges and serve warm or cold.

NOTE: If you have more time you could put the mixture into a lightly greased oven-proof dish and bake the omelette for about 45 minutes at 180C instead of fryinging and grilling it.

Sunday, April 24, 2011

Pizza!


I have finally achieved a decent pizza base. Would it be blasphemous to say 'Allelujah!', particularly on Easter Sunday?

Until now my pizza bases have been a bit too thick and doughy for my liking, and although tonight's wasn't quite as thin and crispy as I would like, it was a definite massive improvement on previous attempts. Oh yes, I'm developing an all consuming love of the Bourke Street Bakery methods, of which this was one. I'll have to make a pilgrimage to Sydney some day.

The Easter weekend seemed to call for junk food, so sunday night was pizza night. I made a pizza bianco (no tomato puree on the base) using the Bourke Street Bakery base method.The topping I chose was wild garlic pesto mixed with a little yoghurt to loosen it (I went out foraging on saturday as I had spotted loads of wild garlic in one of the patches of woodland near us), roast purple sprouting broccoli, finely chopped preserved lemons, and buffalo mozzarella.


Not exactly your traditional topping choices. And yummy with it.

Thursday, April 21, 2011

Croissants and other pastry delights

Generally speaking I'm not a massive lover of pastries for breakfast. They're one of those things that I occasionally get lured into buying by the smell, but then the taste almost never lives up to that promise. I usually find them too greasy, too flakey, and they just don't have enough flavour.

Of course there are some notable exceptions to every rule - I love the much breadier varieties that they make at the Natural Bread Company (an Oxfordshire bakery with a shop in Woodstock) - they're always buttery but not greasy; flakey, but not so much that you get annoyed with the bits of pastry all over you. They have texture and chewability. This, for me, is definitely how pastries should be.

Well, having set my bar quite high, I decided it was time to have a go at making breakfast pastries myself. I have a recipe book from the Bourke Street Bakery in Sydney, Australia which gives brilliantly clear instructions on how to make croissants. Time to take the plunge.

So here goes...

The night before, I mixed up a small amount of yeast, flour, milk and sugar, kneeded it well, then left it in the fridge overnight. This is the croissant ferment.


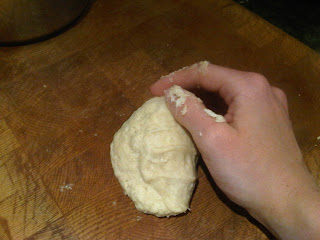
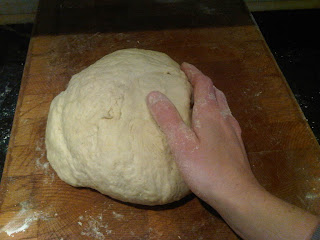
Next day I mixed the dough, kneeded it well and put back in the fridge. The instructions said to leave it there for at least 2 hours; I left mine for about 3 hours.


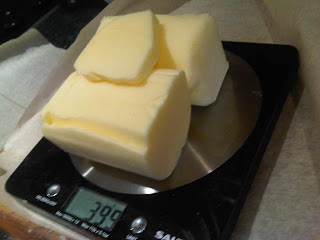
Next, I weighed out a truely extraordinary amount of butter. I actually used 400g instead of the recipe's 500g, as I wanted to achieve pastries that were a bit less greasy than the norm. I bashed the butter into a square about 1cm thick - I placed the butter between 2 pieces of baking parchement and hit it with a rolling pin. Quite theraputic!


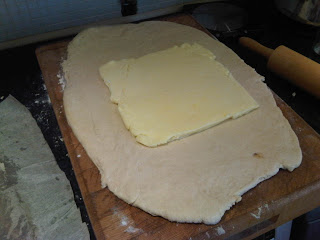
After this I rolled the dough out into a rectangle about the same width as the butter square and about twice the length. I placed the butter in the middle, then folded the dough over the top.


The next step was to roll the dough out into a long rectangle then fold it over; I folded in thirds - one third towards the middle, then the other side over the top of that. I then returned the dough to the fridge to rest for 20 minutes. This had to be repeated twice more, turning the dough through 90 degrees each time I rolled it out. The dough was rolled out 3 times in total.


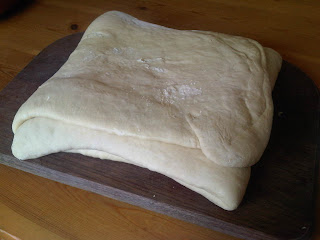
After a final rest in the fridge I had a laminated dough:

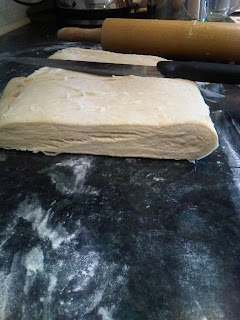
This was now ready to form into pastries.

I had inadvertantly made a hundred-weight of dough, so I had enough to make about 12-15 croissants and also about the same number of bear claws.

Here are the croissants, formed, risen (I let them rise for about an hour and a half, but if its a cool day it may take a bit longer), and ready to go into the oven:


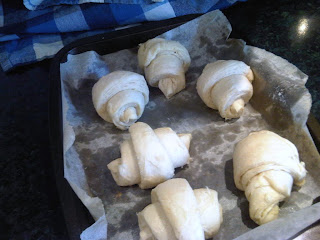
I was very proud that the croissants actually looked like croissants. Amazing!


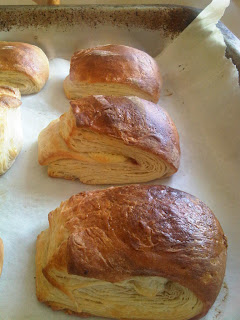
For the bear claws I made about 150g of frangipane and put a teaspoon of it in the centre of each piece of dough along with a teaspoon of damson jelly then folded the dough over and sealed the edges. Any jam would work nicely but I thought the slight sharpness of damsons would complement the frangipane.

The bear claws looked pretty good as they came out of the oven.


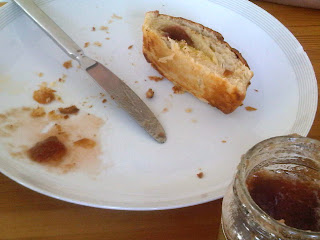
The house smelt lovely for the rest of the day after making these. I was really hoping that their taste would live up to the smell! When I finally did the taste test the next morning (5 minutes in the oven at 180C crisped them up beautifully) they were just as I'd hoped; flakey but still with plenty of dough-texture. The croissants were lovely with some homemade strawberry and mint jam, and the bear claws were tastey just as they came; no extras needed.

Just as well we both liked the outcome as we have freezer full of pastries now! This isn't a recipe I would make often as it is time-consuming and very messy, but I definitely will attempt it again. Its nice to be able to have pastries made to my own preferences. The recipe quantities makes such a lot of pastries that I have several months worth now. I will have to try making the Pain au Raisins recipe next time - its my favourite kind of pastry.


Full marks to the Bourke Street Bakery instructions. Its shaping up to have been an excellent cook-book purchase.

Sunday, April 17, 2011

sushi #2

The coming of spring makes me want salads and sushi. Just like everyone else, I get less bothered about having hot meals for dinner as soon as the weather warms up. Maybe all the blossom springing into bloom around home and work brought an association to mind with the Hanami (cherry blossom) festival in Japan, but whatever it was that made me desire sushi, this weekend I was a bit spoilt, and treated myself to sushi two days in a row - one lot bought, and one lot home made.


Now I know that I have blogged sushi making before, but I do so again because I made some different kinds of sushi this time. I'm sure its a good thing to develop the repertoire!

This time I made nori maki again; the normal nori (seaweed) wrapped sushi, filled with smoked salmon, cucumber, spring onion and a little wasabi. This time I marinated the smoked salmon in a mixture of sake, shoyu and water for an hour before I used it.

I also had a try at inside-out sushi rolls. These were easier to form than I'd been expecting, which was a nice surprise. You start off in the same way as for the nori-maki, but cover the nori and rice with cling film once you've spread the rice on the nori, then turn it over onto the rolling mat so that the seaweed is on the top. I filled these ones with a similar filling; waabi, cucumber, smoked salmon, and then rolled the finished sushi rolls in furikake, which is a Japanese seasoning made from black and white sesame seeds, nori (seaweed), and red shiso leaves. It gave the outside of the rolls an appealing crunch.


And finally....drum roll please... I tried something entirely new: Onigri. These are rice balls filled with tasty morsels and wrapped in a strip of nori. I made one for each of us filled with smoked mackerel, and one each filled with a mixture of Omeboshi (Japanese pickled plums), mirin, and sesame seeds. Those plums were SHARP! The only thing I've had before of similar face-scrunching sourness is the lime pickle you get with poppadums in Indian restaurants. Not unpleasant, but I think I'd make smaller portions next time!


Of course, this was all served up with extra wasabi, shoyu, and pickled ginger condiments, and a small salad of cucmber and spring onion.


Yummy sushi - My favourite.

Thursday, April 14, 2011

Daring Cooks April Challenge

The Daring Cooks April Challenge has been a goody. It has really made me think, puzzle and try to be inventive. Sadly, I'm not sure that I've succeeded on the invention test - I found it difficult to come up with anything non-obvious - but at least it tickled my brain cells!

So here we are: The april challenge was to make a "savoury edible container and fill it with something appropriate".

My immediate thought was to use a pumpkin and stuff it with interesting goodies before roasting it, but I rejected the idea as obvious, and also Dan doesn't very much like pupmkin so it would have been a little antisocial.
Then I thought I could make Pain Bagnat, which I have been meaning to try out for some time. This I rejected beacause the bread in pain bagnat isn't EXACTLY an edible container since the bread and filling are all squashed up together.

An interesting suggestion was made by Dan. He's recently been to Poland for work and had a traditional soup called Zur which he really enjoyed. It was served in a hollowed out round loaf of bread. I loved this idea, but due to time constraints I had to reject it for this challenge as I only had one free weekend to cook before the challenge results had to be posted. Given that I was going to be looking after 3 children that weekend making both bread and a complex soup didn't seem very practical, so I'm keeping this idea for a future occasion.

What to do, what to do......?

Chilled soup in an ice bowl was the front-runner until I saw someone else had already done a salad in an ice bowl. But then, in a dull day at work, I finally came up with the idea to make a savoury sorbet in a savoury cone. The idea pleased me because ice cream in a cone is so familiar, but the taste will be surprising. (Incidentally the savoury icecream research has brought up a few other to try at a later date.)

So, here we go....a gazpacho soup sorbet in a spiced tortilla cone.

Step one: I found a gazpacho recipe which sounded ideal in the Riverford Farm Cook Book. A lovely sounding combination of tomato, cucumber, chilli, herbs and red pepper, which looked beautiful and spring-fresh once all chopped up together:


Step 2: blend everything up and then push it through a fine sieve. I fully expected it not to look at all pretty at this stage!

Step 3: Add olive oil and chill for a few hours. Churn in an icecream maker the afternoon before you want to serve it for dinner, then freeze for at least half an hour.

Step 4: dampen a tortilla wrap (or a portion of one if that's the right size for you - I used about 1/2 of a tortilla for each cone) with a mixture of water and a little olive oil.

Step 5: roll it into a cone shape and secure with a cocktail stick. Sprinkle with a little salt and smoked paprika. Scrunch up some foil into a small ball and place inside the cone so that it doesn't collapse in the oven.

Step 6: place in a preheated oven at 220C for about 8 minutes until the cone is crispy and slightly golden.


Step 7: Allow the cone to cool then scoop your sorbet into it.

Step 8: finely chop some fresh mint leaves and mix with a couple of teaspoons of yoghurt (you can't have icecream with out toppings!), put a blob on top of the sorbet, and enjoy!


I have to admit that I wasn't sure how this would turn out - whether I would actually even be able to eat it, if it would delicious or totally disgusting! In fact, it made a really lovely, quirky, bite sized starter.

We enjoyed it before our sunday dinner on an unseasonably warm spring day, and it was brilliantly refreshing. My tastebuds enjoyed the confusion of having something that was a little bit spicey hot from the chilli at such a cold temperature.


The whole idea has proved a bit of a talking point in my office - opinion is divided on people believing this to have been delicious or inedible!

Blog-checking lines: Renata of Testado, Provado & Aprovado! was our Daring Cooks’ April 2011 hostess. Renata challenged us to think “outside the plate” and create our own edible containers! Prizes are being awarded to the most creative edible container and filling, so vote on your favorite from April 17th to May 16th here at The Daring Kitchen!

Sunday, April 10, 2011

lunch boxes

It felt like high time to expand my lunch options. I've been having the same sort of soups and salads for lunch for weeks, with only minor variations. Time to shake things up a little and make the work day just a little more interesting.

My Seattle-dwelling friend Carisa is a Mexican food fiend, so when she recommended this Mexican soup recipe I figured it must be a good one. Monday was not a good day at work, and it didn't seem like Tuesday was likely to be much better, so a burst of Mexican sunshine in a bowl seemed like the thing to lift my spirits.

I made a few changes to the recipe due to the contents of my cupboards and to adapt it to my taste buds - I didn't have quite enough chickpeas, I used pheasant instead of chicken (we had roast pheasant on sunday and there was just enough left over for this recipe), and added a sprinkle of chilli flakes for heat, and a handful of spinach. Also, we were out of oregano so I used thyme. The measurements in cups instead of grams added a little complication to the process, but I think I got the quantities about right.

I made a rookie-error and under-seasoned the dish, but that was easily rectified at the eating stage. I think if I made this again I'd add a bit more spice - it could do with being a little punchier flavoured for my tastes.


Overall? Sopa Ranchera was tasty, easy to make, with one or two minor adjustments it will make a good spring or autumn lunch.

My second lunchbox experiment was Ottolenghi's Aubergine Cheesecake. I ordered the Ottolenghi cookbook the other day, so while I waited for it to arrive I figured I would browse his recipes from The Guardian newspaper and get some practice in!

I do love it when something looks this colourful and enticing before its even finished:


I adapted the recipe again to suit my fridge contents, using a mild soft goats cheese instead of cream cheese and yoghurt instead of double cream, so my version is probably a bit sharper flavoured than the recipe intended.


It is like a pastry-less quiche. I can completely see why Ottolenghi describes it as a savoury cheesecake as it has a similar texture to it.


It travelled well to work and made a more interesting lunch box than usual, so I'll definitely make this again. Creamy and delicious.

Find the recipe here.

Monday, April 4, 2011

Apple tart

A while back I blogged my love of the Riverford Farm Cook book. In fact I love it so much that I have been evangelising, and I gave a copy to a friend for her birthday a few months ago. When I went to her place for lunch she obligingly served up a dish from the book - the apple and amaretti tart. It was light, crunchy and yummy, and even better I'd never made it myself. So good to be introduced to a recipe you had under your nose the whole time but hadn't made!

This weekend I had a group of lovely ladies over for a meal, so the time had come to make an attempt at the tart. It was super-simple to make, and handily could be made in advance and served at room temperature - the perfect pudding for when you don't want to be spending your time in the kitchen instead of with your guests. The base is not dissimilar to a cheese cake base, so you end up with something like tart tatin but with a crunchier base. I really liked it, especially with a small scoop of creme fraiche on the side.


Not my tart in this picture I'm afraid, but mine did look a lot like it!

I shall now go forth and experiment with different flavour combinations along the same lines - maybe pear with almonds in the base, or rhubarb with ginger biscuits, or perhaps subsitiute the apples for peaches in the amaretti version. Oh the possibilities....

The recipe can be found here. I didn't use quite as much apple as directed as about 200g of apple slices filled my tart tin nicely. I notice that the apples here are a lot more overlapping than mine though, so presumably that's why I didn't need quite so much fruit.